 Promit's Ventspace
Today, we’re going to talk about how to configure a MIDI controller to act as a debugging aid for a game - or any software development project.
Why a MIDI controller?
[caption id=”attachment_1186” align=”alignnone” width=”600”] Photo credit: Wikimedia Commons / CC BY-SA 3.0[/caption]
Why would you want to do this? It’s very common to have a set of internal variables that we want to tweak on the fly, while the game is running, until things are just right. There’s animation, physics, AI, game play and difficulty, graphics, UI, and more. Typically people end up homebrewing a variety of tricks to edit these variables. You might ‘borrow’ a couple keyboard keys and throw an on screen text display in. You might have a developer console command and type in the values. If you really get fancy, you might even have a TCP debug channel that can control things from another UI, maybe even on another computer.
These options all have their pros and cons. Why add MIDI as another option to the mix?
- It's really easy and safe to disable for releases. We're probably not using MIDI for any legitimate user purpose, after all.
- It doesn't require any UI, on any screen.
- Supports platforms like mobile where keystroke debugging can be particularly problematic.
- It's quick to get to edit a large range of parameters in tandem.
- Editing without explicit numerical values avoids the problem of sticking to "convenient" numbers.
- It's easy to give this setup to a non-technical person and let them toy around.
- Tactile editing is just plain fun.
How does a MIDI controller work?
Over the MIDI protocol, naturally. MIDI was standardized in 1983 as a way for musical tools like keyboards, samplers, sequencers, and all sorts of computerized devices to communicate with each other. While in ye olden days the connection was made over a 7 pin DIN cable, many modern controllers have USB interfaces. These are class compliant devices, which means you can simply plug them into a computer and go, without any drivers or mandatory support software.
MIDI itself is a slightly wonky protocol, based strictly around events. There’s a wide range of events, but for our purposes we only really need four: Note On, Note Off, Control Change, and Program Change. Note On/Off are easy - they’re your key down/up equivalents for a MIDI controller. Control Change (CC) represents a value change on an analog control, like a knob or slider. Program Change changes an entire bank or preset.
Note what’s not in there: state. The whole thing is designed to be stateless, which means no state queries either. But many MIDI controllers do have state, in the physical position of their knobs or sliders. That leads us to the dreaded MIDI CC jump. In short, what happens when a value in our software is set to 0 (min) and the user twists a knob is at 127 (max)? The knob will transmit a CC with a value of 126 attached, causing the variable it’s attached to to skyrocket. This desynchronization between software and hardware state can be confusing, inconvenient, and downright problematic.
Choosing a MIDI controller
[caption id=”attachment_1183” align=”alignnone” width=”600”]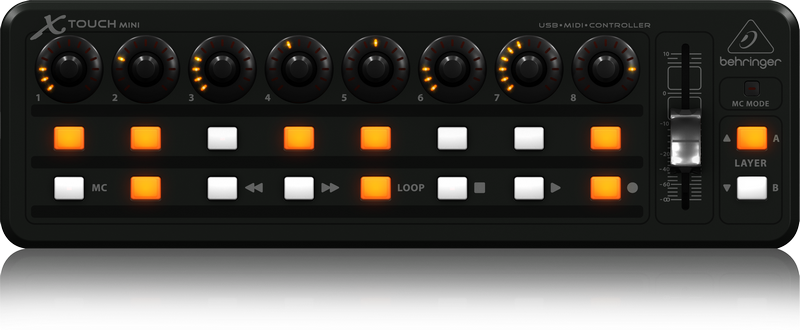 Photo Credit: Behringer/MUSIC Group[/caption]
Enter the Behringer X-Touch Mini. For a trivial $60 street at time of writing, take a look at what it gives us:
- 8 rotary encoders with LED collars for value display
- Volume slider
- 24 push buttons (8 push-knob, 16 LED) with configurable behavior (momentary/toggle)
- Dual control layers, so multiply everything above by two
- Simple class-compliant USB connectivity
Now back up and read that again. Rotary encoders. LED collars. Get it? Encoders aren’t knobs - they spin freely. The value isn’t based on the position of a potentiometer, but digitally stored and displayed using the LEDs around the outside of each encoder. Same goes for the button states. This is a controller that can not only send CC messages but receive them too, and update its own internal state accordingly. (The volume slider is not digital and will still cause CC jumps.)
Setting up the X-Touch Mini
[caption id=”attachment_1180” align=”alignnone” width=”600”]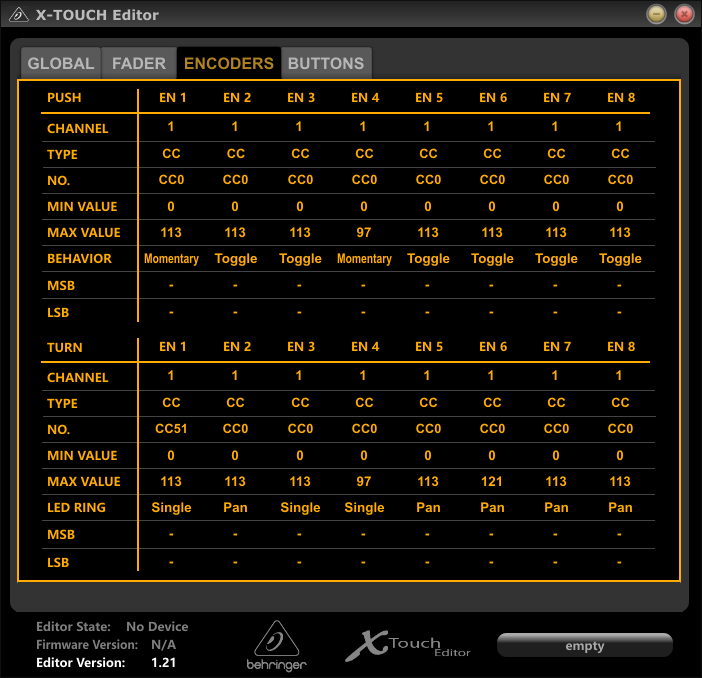 Photo Credit: Promit Roy / CC BY-SA 3.0[/caption]
Behringer offers a program called X-Touch Editor which you’ll want to download. Despite the terrible English and oddball UI, It allows you to configure the X-Touch Mini’s behavior and save it persistently onto the controller’s internal memory. You can change the display style of the LEDs (I recommend fan) and change the buttons between momentary (like a keyboard button) and toggle (push on, push again off). It also offers other options for MIDI behavior, but I recommend leaving that stuff where it is. For my purposes, I set the center row of buttons to act as toggles, and left the rest of it alone.
Understanding the MIDI protocol
At this stage it might be helpful to download a program called MIDI-OX. This is a simple utility that lets you send and monitor MIDI messages, which is very useful in understanding exactly what’s happening when you are messing with the controller. Note that MIDI devices are acquired exclusively - X-Touch Edit, MIDI-OX, and your own code will all lock each other out.
The MIDI messages we’ll be using have a simple structure: a four bit message ID, a four bit channel selection, followed by one or two data bytes. The X-Touch Mini is configured to use channel 11 for its controls out of the box. Here are the relevant message IDs:
enum MidiMessageId
{
    MIDI_NoteOn = 144,
    MIDI_NoteOff = 128,
    MIDI_ControlChange = 176,
    MIDI_ProgramChange = 192,
};
Channels are 0 based in the protocol, so you’ll add 10 to these values when submitting them. NoteOn and NoteOff are accompanied by a note ID (like a key code) and a velocity (pressure). The key codes go from 0-23 for layer A, representing the buttons left to right and top to bottom. When you switch to layer B, they’ll switch over to 24-47. You’ll receive On and Off to reflect the button state, and you can also send On and Off back to the controller to set Toggle mode buttons on or off. This is really handy when hooked up to internal boolean variables: light on = true, light off = false. We’re not interested in the pressure field, but it does need to be set correctly. The values are 127 for NoteOn and 0 for NoteOff.
ControlChange (CC) will appear any time the knobs are rotated, with the knob ID and the current value as data bytes. The default range is 0-127; I recommend leaving it that way and rescaling it appropriately in software. For layer A, the knob IDs go from 1-8 (yes, they’re one based) and the slider is assigned to 9. On layer B that’ll be 10-17 and 18. You can transmit identical messages back to the controller to set the value on its end, and the LED collar will automatically update to match.
The X-Touch will never send you a ProgramChange (PC) by default. However on the current firmware, it will ignore messages that don’t apply to the currently active layer. You can send it a Program Change to toggle between layer A (0) and B (1), and then send the rest of your data for that layer to sync everything properly. PC only has a single data byte attached, which is the desired program.
Writing the MIDI glue code
Go ahead and grab RtMidi. It’s a nice little open source library, which is really just composed of a single header and source file pair, but supports Windows, Linux, and Mac OSX. (I have an experimental patch for iOS support as well that may go up soon.) I won’t cover how to use the library in detail here, as that’s best left to the samples - the code you need is right on their homepage - but I will give a quick overview.
You’ll need to create two objects: RtMidiIn for receiving data, and RtMidiOut for sending it. Each of these has to be hooked to a “port” - since multiple MIDI devices can be attached, this allows you to select which one you want to communicate with. The easiest thing to do here is just to search the port lists for a string name match.
At this point it’s just a question of signing up for the appropriate callbacks and parsing out their data, and then sending the correct messages back. The last step is to bidirectionally synchronize variables in your code to the MIDI controller. I did it with some template/macro nonsense:
void GameStage::MidiSyncOut()
{
	if(_midiOut)
	{
		_midiOut->Send(MIDI_ProgramChange, 0);
		MidiVars(1, 0, 0, 0);
		_midiOut->Send(MIDI_ProgramChange, 1);
		MidiVars(1, 0, 0, 0);
		_midiOut->Send(MIDI_ProgramChange, 0);
	}
}

void GameStage::NoteOn(unsigned int channel, unsigned int note, unsigned int velocity)
{
	MidiVars(0, 0, note, velocity);
}

void GameStage::NoteOff(unsigned int channel, unsigned int note, unsigned int velocity)
{
	MidiVars(0, 0, note, velocity);
}

void GameStage::ControlChange(unsigned int channel, unsigned int control, unsigned int value)
{
	MidiVars(0, 1, control, value);
}

template<typename T1, typename T2, typename T3> void MidiVariableOut(const T1& var, T2 min, T3 max, unsigned int knob, MidiOut* midiOut)
{
	float val = (var - min) / (max - min);
	val = clamp(val, 0.0f, 1.0f);
	unsigned char outval = unsigned char(val * 127);
	midiOut->Send(MIDI_ControlChange + 10, knob, outval);
}

template<typename T1, typename T2, typename T3> void MidiVariableIn(T1& var, T2 min, T3 max, unsigned int knob, unsigned int controlId, unsigned int noteOrCC, unsigned char value)
{
	if(noteOrCC && knob == controlId)
	{
		float ratio = value / 127.0f;
		var = T1(min + (max - min) * ratio);
	}
}

void MidiBoolOut(const bool& var, unsigned int button, MidiOut* midiOut)
{
	if(var)
		midiOut->Send(MIDI_NoteOn + 10, button, 127);
	else
		midiOut->Send(MIDI_NoteOff + 10, button, 0);
}

void MidiBoolIn(bool& var, unsigned int button, unsigned int controlId, unsigned int noteOrCC, unsigned char value)
{
	if(!noteOrCC && button == controlId)
	{
		var = value > 0;
	}
}

#define MIDIVAR(var, min, max, knob) inout ? MidiVariableOut(var, min, max, knob, _midiOut) : MidiVariableIn(var, min, max, knob, controlId, noteOrCC, value)
#define MIDIBOOL(var, button) inout ? MidiBoolOut(var, button, _midiOut) : MidiBoolIn(var, button, controlId, noteOrCC, value)
void GameStage::MidiVars(unsigned int inout, unsigned int noteOrCC, unsigned int controlId, unsigned int value)
{
	if(!_midiOut)
		return;

	MIDIVAR(_fogTopColor.x, 0.0f, 1.0f, 1);
	MIDIVAR(_fogTopColor.y, 0.0f, 1.0f, 2);
	MIDIVAR(_fogTopColor.z, 0.0f, 1.0f, 3);
	MIDIVAR(_fogBottomColor.x, 0.0f, 1.0f, 4);
	MIDIVAR(_fogBottomColor.y, 0.0f, 1.0f, 5);
	MIDIVAR(_fogBottomColor.z, 0.0f, 1.0f, 6);
	MIDIVAR(CoCScale, 1.0f, 16.0f, 8);

	MIDIBOOL(MUSIC, 8);
	MIDIBOOL(RenderEnvironment, 9);
	MIDIBOOL(DepthOfField, 10);
}
Probably not going to win any awards for that, but it does the trick. MidiVars does double duty as an event responder and a full data uploader. MidiSyncOut just includes the PC messages to make sure both layers are fully updated. Although I haven’t done it here, it would be very easy to data drive this, attach variables to MIDI controls from dev console, etc.
Once everything’s wired up, you have a completely independent physical display of whatever game values you want, ready to tweak and adjust to your heart’s content at a moment’s notice. If any of you have particularly technically minded designers/artists, they’re probably already using MIDI controllers along with independent glue apps that map them to keyboard keys. Why not cut out the middle man and have explicit engine/tool support?
Comments